What
is Sanitary Napkin?
Sanitary
napkin is a hygiene absorbent product used by women during menstrual periods.
It is a product of technical textile. A
sanitary pad/ menstrual pad is an absorbent item worn by a woman while she is
menstruating, while she is recovering from vaginal surgery, for lochia (post
birth bleeding), after an abortion, or in any other situation where it is
necessary to absorb a flow of blood from a women’s vagina.
Through
the ages women have used different forms of menstrual protection.
Menstrual pads have been mentioned in history as early as the 10th century in
Ancient Greece. Before the disposable pad was invented, most women used
rags, cotton, or sheep’s wool in their underwear to stem the flow of menstrual
blood. Knitted pads, rabbit fur, even grass were all used by women to handle
their periods.
The
very first disposable pads were thought up by nurses, looking for
new methods to stop excessive bleeding, particularly on the battlefield. The first pads were made from wood
pulp bandages by nurses in France. It was very absorbent, and cheap enough
to throw away afterwards. Commercial manufacturers borrowed this idea
and the first disposable pads were available for purchase came as early
as 1888 – called the South ball pad.
In
America, Johnson & Johnson developed their own version in 1896 called
Lister’s Towel: Sanitary Towel’s for Ladies. Kotex's
first products made with this wood pulp (Cellu- cotton) appeared in 1888.
Until disposable sanitary pads were created, cloth or reusable pads
were widely used to collect menstrual blood. Women often used a variety of
home-made menstrual pads which they crafted from various fabrics, or other
absorbent materials, to collect menstrual blood.
Even
after disposable pads were commercially available, for several years
they were too expensive for many women to afford. When they could
be afforded, women were allowed to place money in a box so that they would not
have to speak to the clerk and take a box of pads from the counter them. It
took several years for disposable menstrual pads to become commonplace.
However, they are now used nearly exclusively in most of the industrialized
world.
The
first of the disposable pads were generally in the form of a cotton wool or
similar fibrous rectangle covered with an absorbent liner. The liner ends were
extended front and back so as to fit through loops in a special girdle or belt
worn beneath undergarments. This design was notorious
for slipping either forward or back of the intended position.


Later
an adhesive strip was placed on the bottom of the pad for attachment to
the saddle of the panties, and this became a favored method with women. The
belted sanitary napkin quickly disappeared during the early 1980s.


Types
of Sanitary Pads
Shopping for sanitary
pads in a major department store can be like picking a needle out of a
haystack. There are dozens of types of brightly colored packages boasting
different materials, absorbencies, shapes and sizes. It can be intimidating,
especially for a young woman buying them for the first time. If you know what
you're looking for and the type of flow you generally have, the search for the
perfect product becomes a little easier.
There are 2 types of
sanitary pads:
Disposable Menstrual Pads
There are several
different types of disposable menstrual pads:
— Panty
Liner – Designed to absorb daily vaginal discharge, light
menstrual flow, "spotting", and slight urinary incontinence.
— Ultra-thin
– A very compact (thin) pad, which may be as absorbent as a Regular or
Maxi/Super pad but with less bulk.
— Regular
– A middle range absorbency pad.
— Maxi
/ Super – A larger absorbency pad, useful for the start of the
menstrual cycle when menstruation is often heaviest.
— Overnight
– A longer pad to allow for more protection while the wearer is lying down,
with absorbency suitable for overnight use.
— Maternity
–
These are usually slightly longer than a maxi/Super pad and are designed to be
worn to absorb lochia (bleeding that occurs after childbirth) and also
can absorb urine.
Cloth Menstrual Pads
Alternatively, some women
use a washable or reusable cloth menstrual pad. These are made from a number of
types of fabric - most often cotton flannel, or hemp (which is highly absorbent
and not as bulky as cotton). Most styles have wings that secure around the
underpants, but some are just held in place (without wings) between the body
and the underpants. Some (particularly the older styles) are available in
belted styles.
Washable menstrual pads
do not need to be disposed of after use and therefore offer a more economical
alternative for women. Also called "mama cloth", reusable menstrual
pads. They have become a popular alternative and are gaining in popularity
among women, because they are allergen- and perfume-free, and can be more
comfortable for women who suffer from irritations from using disposable pads.


What
is Tampons?
Tampons (say: TAM-ponz)
also absorb menstrual blood, but they work from inside the vagina. A tampon
is also made of absorbent material, but it's pressed tight into a small
cylinder shape.
The question all girls wonder is — how do you put them
in? Some tampons have applicators, which are plastic or cardboard tubes that
help put the tampon in place. Other tampons can be inserted using your fingers.
Many girls start out using pads, but might want to use tampons when they do
sports or go swimming.


How
to use it?

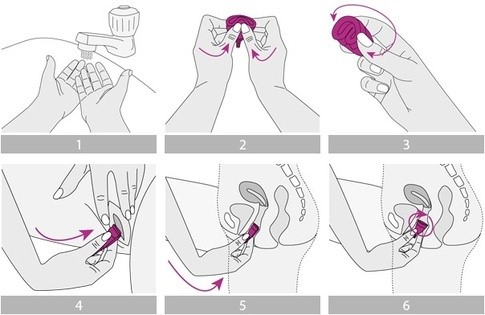
What is
Menstrual Cup/ Shecup?
A Menstrual cup/
Shecup is a type of feminine hygiene product which is usually made
of medical grade silicone, shaped like a bell and is flexible. It
is worn inside the vagina during menstruation to catch menstrual fluid (blood).
About every 4-12 hours
(depending on the amount of flow), the menstruating woman removes the menstrual
cup from her vagina, empties the collected menstrual blood into a toilet or
sink, washes the cup under running water and inserts it again. At the end of the
monthly period, the cup can be sterilized, usually by boiling in water. Unlike
tampons and pads, the cup collects menstrual fluid rather than absorbing
it.
Manufacturers have different
recommendations for when to replace the cups, but in general they can be reused
for five years or so. Disposable menstrual cups are also available – these
work in a similar way to regular menstrual cups except they are disposed of
after every use or (for some brands) after every cycle.

How to use it?
Health
and Safety:
— Shecup
is made of health grade non-toxic non-allergic silicone, hence there is no risk
of infections or vaginitis.
— Silicone
is inert and smooth thus there are no problems like rashes or irritation.
— Shecup
is a passive product, it only collects the menstrual discharge and does not
interfere with the natural normal functioning and cleaning process of the
vagina.
— Shecup
can be worn for long hours without any health hazards.
— Shecup
is the only menstrual sanitary product which can be sterilised.
Hygiene and
Cleanliness:
Since made of silicone,
can be sterilised, making it completely hygienic;
— Shecup
wipes are provided to clean and disinfect Shecup before and after usage.
Convenience:
— Shecup
is reusable, hence there is no inconvenience of carrying or storing
bulky products or disposing used ones;
— Shecup
can be worn for 12 hours or more without any problems, as it can hold up to a
quarter of the average monthly menstrual discharge (5 to 6 hours in case of
women with heavy flow);
— Shecup
Can be worn safely at night.
Comfort:
— Leave
no room for any leakage and hence no risk of stains.
— Allows
the user to wear the clothes as desired, since worn inside the body.
— Allows
the user to take up extreme physical activities and also swimming as it is
non-absorbent.
Economy:
— Shecup
is reusable and can last lifetime if used properly as instructed, thereby
avoiding any recurring cost;
— Cost
of Shecup can be recovered within the first year of usage.
Eco-Friendly:
Menstrual Cycles in a
woman’s lifetime is for approximately 35 years. A Woman on an
average may have 400 or more periods in her lifetime. Widely used menstrual
sanitary protections-Pads & Tampons (Absorbents). They are prone to
allergies, rashes. Higher absorbency pad/tampon purely allow longer
between changes but poses risks and more problems with your body's natural
moisture levels and self-cleaning mechanisms.
On an average a woman
uses 10,000 – 12,000 pads/tampons in her lifetime. 12,000 pads means approximately
250 cubic feet of landfill, 1 pad takes hundreds of years to decompose since
not easily bio degradable. The manufacturing process of pads/tampons adds to
pollution and also results in the depletion of natural resources like wood.
Shecup is reusable and
recyclable hence there is no waste adding to environmental hazards.


